To add a check box or radio button to an Excel Spreadsheet, you must turn on the Developer's Tab and Ribbon. Click on the Office Button, select Excel Options, select Popular, select Show Developer tab in the Ribbon. This will give you access to the Developer Ribbon.
Once you have opened the Developer Ribbon, click on Insert, select the check box or radio button from the options.
To activate the box and button, save the spreadsheet as a Macro Enabled Spreadsheet. Click on the Office Button, select Save As, select Excel Macro Enabled.
Once saved the check boxes and radio buttons will be active.
Showing posts with label Excel. Show all posts
Showing posts with label Excel. Show all posts
Tuesday, June 16, 2009

Tuesday, June 2, 2009
Excel: Custom Lists
Click Office button > Excel Options > Popular tab > Edit Custom List
Type the new list in the List entries window > OK
To import a custom Auto Fill list from your spreadsheet
Highlight your list >Click the Office button > Excel Options > Popular tab > Edit Custom List
The range of cells you previously highlighted should be present in the Import list
Click the Import button and the new Auto Fill list appears in the Custom Lists window
Type the new list in the List entries window > OK
To import a custom Auto Fill list from your spreadsheet
Highlight your list >Click the Office button > Excel Options > Popular tab > Edit Custom List
The range of cells you previously highlighted should be present in the Import list
Click the Import button and the new Auto Fill list appears in the Custom Lists window
Wednesday, May 27, 2009
Excel: Custom Sorting
1. Create your list in Excel. If possible include a header row for easy identification while sorting.
2. Highlight the information you need to sort.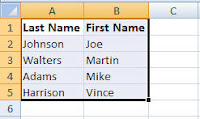
3. Click on the Sort & Filter button found on the Home Ribbon.
4. Select Custom Sorting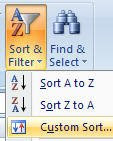
5. The Sort pop-up box will appear.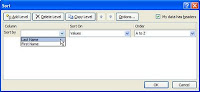 Select the column you need to sort information by: Last Name, Address, etc… If your column headers do not appear as options for sorting in the Sort by option, click on the box next to the My data has headers.
6. If you need to sort by more than one criterion, click on Add a Level and repeat above instructions.
7. Click on OK.
Additional sorting options include: Sort On which includes Cell color, Font color and Icon; Order which includes: A To Z; Z to A; and Custom List.
2. Highlight the information you need to sort.
3. Click on the Sort & Filter button found on the Home Ribbon.
4. Select Custom Sorting
5. The Sort pop-up box will appear.
Select the column you need to sort information by: Last Name, Address, etc… If your column headers do not appear as options for sorting in the Sort by option, click on the box next to the My data has headers.6. If you need to sort by more than one criterion, click on Add a Level and repeat above instructions.
7. Click on OK.
Additional sorting options include: Sort On which includes Cell color, Font color and Icon; Order which includes: A To Z; Z to A; and Custom List.
Monday, January 19, 2009
Microsoft Tip of the Week: Contextual Tabs
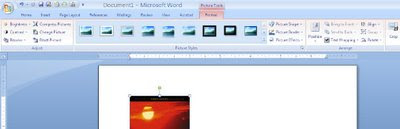
The Contextual Tab appears when you are working with specific objects such as pictures, charts, or objects in Microsoft 2007 Word, PowerPoint, and Excel.
In Word, you will find a Contextual Tab when working with a picture. Notice the Formatting Ribbon also appears when working with a picture. These additional tabs and ribbons are included to help with formatting images, pictures, and objects that you have inserted into a document. To access the Contextual Tab, click on the picture, image, or object.
In Word, you will find a Contextual Tab when working with a picture. Notice the Formatting Ribbon also appears when working with a picture. These additional tabs and ribbons are included to help with formatting images, pictures, and objects that you have inserted into a document. To access the Contextual Tab, click on the picture, image, or object.
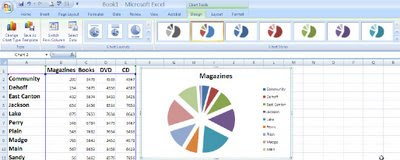
In Excel, you will find a Contextual Tab when working with a chart. Notice the Design Ribbon also appears when working with a chart. These additional tabs and ribbons are included to help with formatting charts, pictures, and images. To access the Contextual Tab, click on the chart, pictures, or image.
Tuesday, January 6, 2009
Microsoft Tip of the Week Excel: Repeat Rows At Top
Microsoft Tip of the Week Excel: Rows to Repeat at the Top
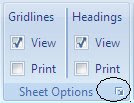
 Click on the Page Layout Ribbon and locate the Sheet Options launch arrow.
  A new Page Setup box will appear.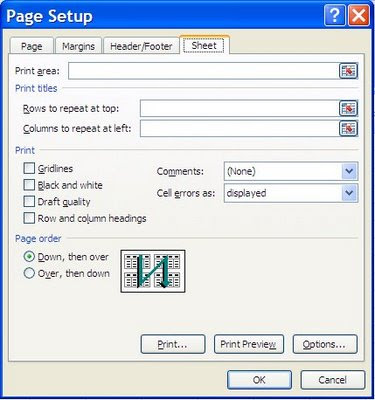
Click on the small box next to the Rows to repeat at top. A new Page Setup-Rows to repeat at top box will appear requesting which rows you would like to repeat.
You can click on the row number to highlight the area or highlight manually using your mouse.
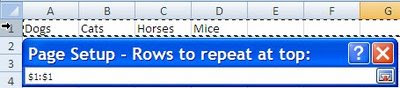
Once you have the correct information entered, click on the box again to return to your Page Setup box.
Click OK to secure your task and return to your spreadsheet.
Sometimes it is necessary to have the column headers to print on every Excel Spreadsheet. This can be done using the Rows to repeat at the top option found on the Page Layout Ribbon.
Click on the Page Layout Ribbon and locate the Sheet Options launch arrow. A new Page Setup box will appear. Click on the small box next to the Rows to repeat at top.
A new Page Setup-Rows to repeat at top box will appear requesting which rows you would like to repeat.You can click on the row number to highlight the area or highlight manually using your mouse.
Once you have the correct information entered, click on the box again to return to your Page Setup box.
Click OK to secure your task and return to your spreadsheet.
Monday, December 29, 2008
Microsoft Tip of the Week Excel: Using Text Orientation and Wrap Text
Excel 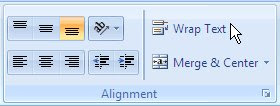 When you need your text to wrap within a fixed width of a cell use the Wrap Text option on the Alignment Section
Click on the Cell(s), and then click on Wrap Text
Give it a try:
Type “Joe Doe is a Waiter.” in cell A1.
Click out of the cell and then click on the cell again.
Using the Text Orientation for text orientation within a cell:
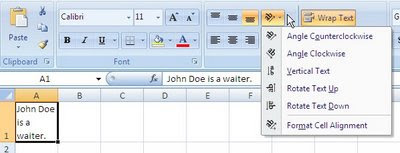
Click on the cell(s) that you would like to change the orientation. Click on the Text Orientation button on the Alignment Section of the Home Ribbon.
Select the option you need from the menu.
Using Word Wrap and Text Orientation on the Alignment Section:
When you need your text to wrap within a fixed width of a cell use the Wrap Text option on the Alignment SectionClick on the Cell(s), and then click on Wrap Text
Give it a try:
Type “Joe Doe is a Waiter.” in cell A1.
Click out of the cell and then click on the cell again.
Click on Wrap Text
Using the Text Orientation for text orientation within a cell:
Click on the cell(s) that you would like to change the orientation. Click on the Text Orientation button on the Alignment Section of the Home Ribbon.
Select the option you need from the menu.
Subscribe to:
Posts (Atom)