To add a check box or radio button to an Excel Spreadsheet, you must turn on the Developer's Tab and Ribbon. Click on the Office Button, select Excel Options, select Popular, select Show Developer tab in the Ribbon. This will give you access to the Developer Ribbon.
Once you have opened the Developer Ribbon, click on Insert, select the check box or radio button from the options.
To activate the box and button, save the spreadsheet as a Macro Enabled Spreadsheet. Click on the Office Button, select Save As, select Excel Macro Enabled.
Once saved the check boxes and radio buttons will be active.
Tuesday, June 16, 2009

Tuesday, June 2, 2009
Excel: Custom Lists
Click Office button > Excel Options > Popular tab > Edit Custom List
Type the new list in the List entries window > OK
To import a custom Auto Fill list from your spreadsheet
Highlight your list >Click the Office button > Excel Options > Popular tab > Edit Custom List
The range of cells you previously highlighted should be present in the Import list
Click the Import button and the new Auto Fill list appears in the Custom Lists window
Type the new list in the List entries window > OK
To import a custom Auto Fill list from your spreadsheet
Highlight your list >Click the Office button > Excel Options > Popular tab > Edit Custom List
The range of cells you previously highlighted should be present in the Import list
Click the Import button and the new Auto Fill list appears in the Custom Lists window
Wednesday, May 27, 2009
Excel: Custom Sorting
1. Create your list in Excel. If possible include a header row for easy identification while sorting.
2. Highlight the information you need to sort.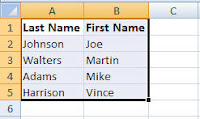
3. Click on the Sort & Filter button found on the Home Ribbon.
4. Select Custom Sorting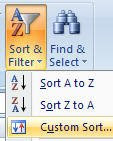
5. The Sort pop-up box will appear.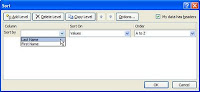 Select the column you need to sort information by: Last Name, Address, etc… If your column headers do not appear as options for sorting in the Sort by option, click on the box next to the My data has headers.
6. If you need to sort by more than one criterion, click on Add a Level and repeat above instructions.
7. Click on OK.
Additional sorting options include: Sort On which includes Cell color, Font color and Icon; Order which includes: A To Z; Z to A; and Custom List.
2. Highlight the information you need to sort.
3. Click on the Sort & Filter button found on the Home Ribbon.
4. Select Custom Sorting
5. The Sort pop-up box will appear.
Select the column you need to sort information by: Last Name, Address, etc… If your column headers do not appear as options for sorting in the Sort by option, click on the box next to the My data has headers.6. If you need to sort by more than one criterion, click on Add a Level and repeat above instructions.
7. Click on OK.
Additional sorting options include: Sort On which includes Cell color, Font color and Icon; Order which includes: A To Z; Z to A; and Custom List.
Thursday, April 9, 2009
Word: Embed an Excel Worksheet
1. Place the insertion point where you want the Excel worksheet to be.
2. Select the Insert Tab to reveal the Insert Ribbon and then click on the Object button found in the Text Group.
3. Select the type of worksheet you want embedded in your document and then click OK.
2. Select the Insert Tab to reveal the Insert Ribbon and then click on the Object button found in the Text Group.
3. Select the type of worksheet you want embedded in your document and then click OK.

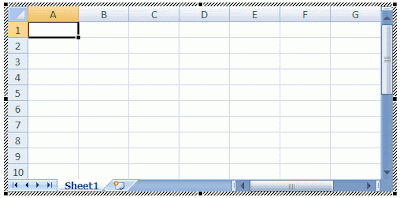
An Excel worksheet will appear. Note the change in the ribbon. It is now the Excel Ribbons.
4. Click outside of the Excel worksheet to covert back to the Word Ribbons.
5. Click on the worksheet to reopen the Excel options.
Subscribe to:
Posts (Atom)