Wednesday, December 16, 2009
PowerPoint
Need an idea on how to show off your family photos during your holiday gatherings? You can use a PowerPoint presentation using family photos to create a parade of family memories. Add music in the background and set the presentation to loop for continuous play. Want a wide screen to show off your work? See if your television can be attached to your computer. The show will then play on your tv.
Wednesday, November 11, 2009
Windows Movie Maker Download
Windows Movie Maker allows you to create, edit, and share your home movies right from your computer. For free downloads for XP go to Windows XP Movie Maker 2.1 Download. Movie Maker for Vista and Windows 7 go to Movie Maker Windows Live.
Friday, October 9, 2009
E Readers
I've been asked how many types of electronic readers or e readers are out there. I have found an interesting site that features quite a few types and styles. While the terminology is a bit technical in nature, the articles that are linked to each unit gives additional information that can be very helpful. http://wiki.mobileread.com/wiki/E-book_Reader_Matrix
Monday, August 3, 2009
Monday, July 27, 2009
Excel: Create a Subtotal
Creating a subtotal in Excel:
Click on the range of cells that you want to subtotal. Then click on the Data tab to reveal the Data Ribbon options. You will find the Subtotal button in the Outline Group.
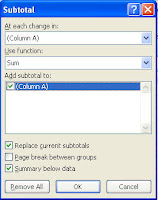
A pop up box will appear. Under At Each Change In, select the correct value option that applies to your worksheet. Select the funtion you need for your subtotals under the Use Funtion menu. Then select the column you want the subtotals caculated.
Then Click on OK.
To remove a subtotal. Click on any cell in the subtotaled column. Click on the Data tab and then click on the subtotal button in the Outline group. Finally, click on Remove all.
Tuesday, June 16, 2009
Excel: Additing Check Boxes to an Excel Cell
To add a check box or radio button to an Excel Spreadsheet, you must turn on the Developer's Tab and Ribbon. Click on the Office Button, select Excel Options, select Popular, select Show Developer tab in the Ribbon. This will give you access to the Developer Ribbon.
Once you have opened the Developer Ribbon, click on Insert, select the check box or radio button from the options.
To activate the box and button, save the spreadsheet as a Macro Enabled Spreadsheet. Click on the Office Button, select Save As, select Excel Macro Enabled.
Once saved the check boxes and radio buttons will be active.
Tuesday, June 2, 2009
Excel: Custom Lists
Click Office button > Excel Options > Popular tab > Edit Custom List
Type the new list in the List entries window > OK
To import a custom Auto Fill list from your spreadsheet
Highlight your list >Click the Office button > Excel Options > Popular tab > Edit Custom List
The range of cells you previously highlighted should be present in the Import list
Click the Import button and the new Auto Fill list appears in the Custom Lists window
Wednesday, May 27, 2009
Excel: Custom Sorting
1. Create your list in Excel. If possible include a header row for easy identification while sorting.
2. Highlight the information you need to sort.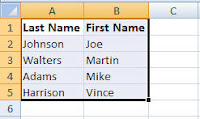
3. Click on the Sort & Filter button found on the Home Ribbon.
4. Select Custom Sorting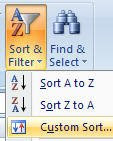
5. The Sort pop-up box will appear.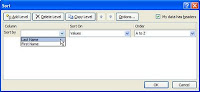 Select the column you need to sort information by: Last Name, Address, etc… If your column headers do not appear as options for sorting in the Sort by option, click on the box next to the My data has headers.
6. If you need to sort by more than one criterion, click on Add a Level and repeat above instructions.
7. Click on OK.
Additional sorting options include: Sort On which includes Cell color, Font color and Icon; Order which includes: A To Z; Z to A; and Custom List.
2. Highlight the information you need to sort.
3. Click on the Sort & Filter button found on the Home Ribbon.
4. Select Custom Sorting
5. The Sort pop-up box will appear.
Select the column you need to sort information by: Last Name, Address, etc… If your column headers do not appear as options for sorting in the Sort by option, click on the box next to the My data has headers.6. If you need to sort by more than one criterion, click on Add a Level and repeat above instructions.
7. Click on OK.
Additional sorting options include: Sort On which includes Cell color, Font color and Icon; Order which includes: A To Z; Z to A; and Custom List.
Thursday, April 9, 2009
Word: Embed an Excel Worksheet
1. Place the insertion point where you want the Excel worksheet to be.
2. Select the Insert Tab to reveal the Insert Ribbon and then click on the Object button found in the Text Group.
3. Select the type of worksheet you want embedded in your document and then click OK.
2. Select the Insert Tab to reveal the Insert Ribbon and then click on the Object button found in the Text Group.
3. Select the type of worksheet you want embedded in your document and then click OK.

An Excel worksheet will appear. Note the change in the ribbon. It is now the Excel Ribbons.
4. Click outside of the Excel worksheet to covert back to the Word Ribbons.
5. Click on the worksheet to reopen the Excel options.
Wednesday, March 25, 2009
What is the last book I read?
The last book I read was the Shack. It was recommended by a friend of mine that thought it was a great novel. It inspired her to think more about the direction of her life. I admit I was disappointed. I suppose if you feel lost when you begin to read it, you may find it inspiring. I was also disappointed by the ending. I thought it was a cop out because it was too A typical.
Monday, March 23, 2009
DimDim Online Presentation
I have been working with the online presentation site, DimDim
It has a simple plug in that needs to be loaded. Outside of that it is easy to use.
It has a simple plug in that needs to be loaded. Outside of that it is easy to use.
Tuesday, January 27, 2009
Microsoft Tip of the Week Outlook: New Message Alerts
Sometimes you are working in your profile on the public floor and you do not want the New Message Alert to fade in and out for the patron or customers to see.
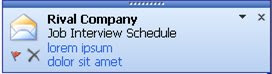
To remove the New Message Alert:
1. Click on Tools on the Toolbar
2. Select Options
3. Click on Email Options
 4. Click on Advanced E-Mail Options
5. Click off Display a New Mail Desktop Alert.
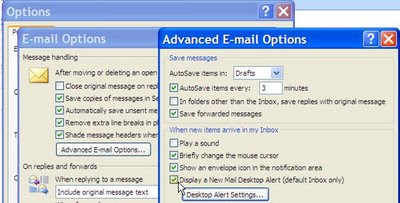
6. Click on OK.
To remove the New Message Alert:
1. Click on Tools on the Toolbar
2. Select Options
3. Click on Email Options
4. Click on Advanced E-Mail Options5. Click off Display a New Mail Desktop Alert.
6. Click on OK.
Monday, January 19, 2009
Microsoft Tip of the Week: Contextual Tabs
The Contextual Tab appears when you are working with specific objects such as pictures, charts, or objects in Microsoft 2007 Word, PowerPoint, and Excel.
In Word, you will find a Contextual Tab when working with a picture. Notice the Formatting Ribbon also appears when working with a picture. These additional tabs and ribbons are included to help with formatting images, pictures, and objects that you have inserted into a document. To access the Contextual Tab, click on the picture, image, or object.
In Word, you will find a Contextual Tab when working with a picture. Notice the Formatting Ribbon also appears when working with a picture. These additional tabs and ribbons are included to help with formatting images, pictures, and objects that you have inserted into a document. To access the Contextual Tab, click on the picture, image, or object.
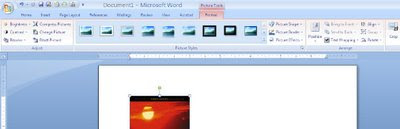
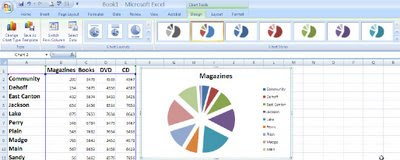
In Excel, you will find a Contextual Tab when working with a chart. Notice the Design Ribbon also appears when working with a chart. These additional tabs and ribbons are included to help with formatting charts, pictures, and images. To access the Contextual Tab, click on the chart, pictures, or image.
Tuesday, January 6, 2009
Microsoft Tip of the Week Excel: Repeat Rows At Top
Microsoft Tip of the Week Excel: Rows to Repeat at the Top
 Click on the Page Layout Ribbon and locate the Sheet Options launch arrow.
 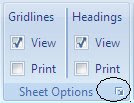 A new Page Setup box will appear.
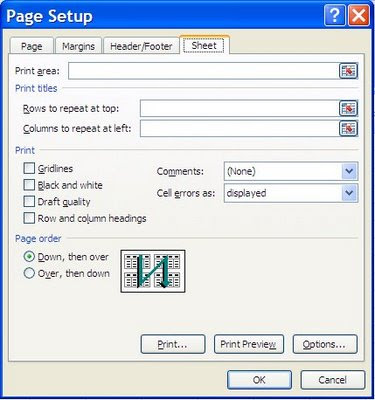
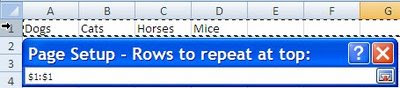
Click on the small box next to the Rows to repeat at top. A new Page Setup-Rows to repeat at top box will appear requesting which rows you would like to repeat.
You can click on the row number to highlight the area or highlight manually using your mouse.
Once you have the correct information entered, click on the box again to return to your Page Setup box.
Click OK to secure your task and return to your spreadsheet.
Sometimes it is necessary to have the column headers to print on every Excel Spreadsheet. This can be done using the Rows to repeat at the top option found on the Page Layout Ribbon.
Click on the Page Layout Ribbon and locate the Sheet Options launch arrow. A new Page Setup box will appear. Click on the small box next to the Rows to repeat at top.
A new Page Setup-Rows to repeat at top box will appear requesting which rows you would like to repeat.You can click on the row number to highlight the area or highlight manually using your mouse.
Once you have the correct information entered, click on the box again to return to your Page Setup box.
Click OK to secure your task and return to your spreadsheet.
Monday, January 5, 2009
Microsoft Tip of the Week Word: Adding a Text Box
Microsoft Office 2007: Tip of the Week
The Insert Ribbon: Adding a Text Box
The Insert Ribbon Groups include Pages, Tables, Illustrations, Links, Headers & Footers, Text, and Symbols.
One of the upgrades to 2007 includes additional options for the Text Box.
There are total of 36 styles to select from. You can change the size, shape, and color of each box using the formatting Ribbon that appears after you insert the text box.

Give it a try:
Open your word document
Click on the Insert Ribbon
Click on Text Box in the Text group
Select Mod Quote
Change the color to Red using the Text Box Styles Group then Shape Fill or the shortcut colors option
Change the shape to a happy smile face.
The Insert Ribbon: Adding a Text Box
The Insert Ribbon Groups include Pages, Tables, Illustrations, Links, Headers & Footers, Text, and Symbols.
One of the upgrades to 2007 includes additional options for the Text Box.
There are total of 36 styles to select from. You can change the size, shape, and color of each box using the formatting Ribbon that appears after you insert the text box.
Give it a try:
Open your word document
Click on the Insert Ribbon
Click on Text Box in the Text group
Select Mod Quote
Change the color to Red using the Text Box Styles Group then Shape Fill or the shortcut colors option
Change the shape to a happy smile face.
Subscribe to:
Posts (Atom)