Showing posts with label Microsoft Tip of the Week. Show all posts

Friday, August 24, 2012

Shazam


Hi Everyone,
During the evening, I often times log onto one of our local radio stations to listen to music.  I sit in my comfy chair with a diet pop and a good read or my iPad.  During that time, it never fails, I hear a song that I would like to put in one of my playlists.  Unfortunately, the DJ doesn't always tell you the name of the song or the artist.  This can be an oldies favorite or a new song by a new artists that I would like to listen to again. Tracking it down isn't always easy until I discovered Shazam.
Shazam is a free app available for multiple platforms such as Android and Apple.  It will record a small sample of the music while it is being played and then search for the song and artists.  Once Shazam identifies the title and artist, you have the option of being redirected to the iTunes store, YouTube Videos as well as other site options for purchasing.  I, however, go and search the SCDL online catalog to see if we have it first.  I like to make sure it is really something I would like to buy or just listen to now and again.
 
To check out this month's featured app:
Visit your device app store and type in the keyword Shazam to locate and download the free app.
 
How to use the Shazam app:
1.  Start playing a piece of music from the radio or other source.
2. Open up the Shazam app and tap the launch button.
 
 
3. You will see a Listening screen with a spinning wheel that looks like a record.
 
NOTE:  You must not talk while Shazam is listening to the music. 
4.  After Shazam identifies the song and/or artist a new screen will appear with detailed information about the artists, track preview option, your present and previous searches (tags), purchasing, sharing, and video information.
 
 
5. There is also a Similar option .  Tap it to find other songs and artistics in the same genre.
 
Enjoy the Music!
 

Friday, July 6, 2012

PowerPoint 2010 Using Smart Art Heirarchy for a Family Tree

Hi Everyone,
I'm the family history expert for my family.  Now that the next generation has taken an interest, they ask what have I discovered lately.  Sending a chart of recent family finds can be difficult.  (Everyone is using a different family tree storage option.)  To make it easier for everyone, I've turned to PowerPoint 2010 and use the Smart Art Hierarchy option.  It is easy to use and can be sent via email to those who request the information.  Most of the kids have PowerPoint or an Open Source that accepts PowerPoint.  They can take the information they want or add it to their files for later. 

In PowerPoint 2010 Smart Art Hierarchy, there is an option for photos as well as text.  If I have an image to go with the name, I can easily insert the image using the insert picture option embedded in the text box.
1. Open PowerPoint 2010 and select the Blank Slide option.

2.  Now select the Smart Art option found on the Insert tab and select Hierarchy from the list and use the top, left hand style.  Then click OK.


3.  Once the Smart Art has appeared on your blank slide two new toolbars, Design and Format, will appear.  Select the Design toolbar and in the Layout group select Picture Organization. 

 
NOTE:  The text boxes will change to text boxes that can accept images.

4.  To add text, click on the box you want to add information and type.

5.  To add a picture, click on the picture icon and follow the prompts to add a photo or image to your text box: 1.  Click on Image box.  2.  Select image.  3.  Click on Insert.


Now save your presentation as usual, and it is ready so show.
 

Monday, April 26, 2010

Sorting in Outlook

Color categories user in Microsoft Outlook? Did you know that you can sort by those categories. Click on the Arranged by option on the Inbox. Select Categories.

The categories are grouped by color. You can arrange them from newest to oldest or oldest to newest.

Tuesday, June 16, 2009

Excel: Additing Check Boxes to an Excel Cell

To add a check box or radio button to an Excel Spreadsheet, you must turn on the Developer's Tab and Ribbon. Click on the Office Button, select Excel Options, select Popular, select Show Developer tab in the Ribbon. This will give you access to the Developer Ribbon.
Once you have opened the Developer Ribbon, click on Insert, select the check box or radio button from the options.
To activate the box and button, save the spreadsheet as a Macro Enabled Spreadsheet. Click on the Office Button, select Save As, select Excel Macro Enabled.
Once saved the check boxes and radio buttons will be active.

Thursday, April 9, 2009

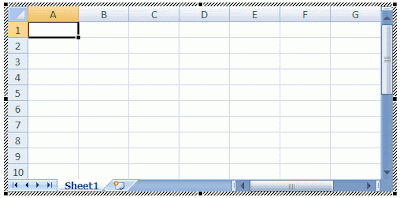
Word: Embed an Excel Worksheet

1. Place the insertion point where you want the Excel worksheet to be.
2. Select the Insert Tab to reveal the Insert Ribbon and then click on the Object button found in the Text Group.
3. Select the type of worksheet you want embedded in your document and then click OK.


An Excel worksheet will appear. Note the change in the ribbon. It is now the Excel Ribbons.


4. Click outside of the Excel worksheet to covert back to the Word Ribbons.
5. Click on the worksheet to reopen the Excel options.

Tuesday, January 27, 2009

Microsoft Tip of the Week Outlook: New Message Alerts

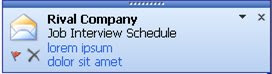
Sometimes you are working in your profile on the public floor and you do not want the New Message Alert to fade in and out for the patron or customers to see.


To remove the New Message Alert:
1. Click on Tools on the Toolbar
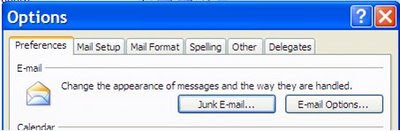
2. Select Options
3. Click on Email Options
4. Click on Advanced E-Mail Options
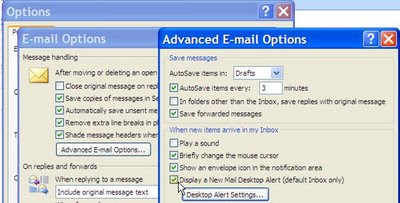
5. Click off Display a New Mail Desktop Alert.


6. Click on OK.

Monday, January 19, 2009

Microsoft Tip of the Week: Contextual Tabs

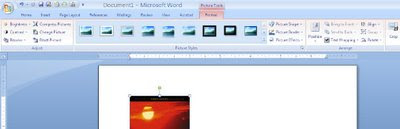
The Contextual Tab appears when you are working with specific objects such as pictures, charts, or objects in Microsoft 2007 Word, PowerPoint, and Excel.

In Word, you will find a Contextual Tab when working with a picture. Notice the Formatting Ribbon also appears when working with a picture. These additional tabs and ribbons are included to help with formatting images, pictures, and objects that you have inserted into a document. To access the Contextual Tab, click on the picture, image, or object.


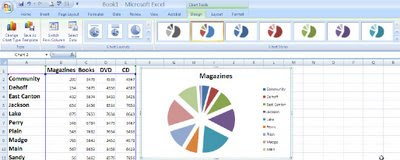
In Excel, you will find a Contextual Tab when working with a chart. Notice the Design Ribbon also appears when working with a chart. These additional tabs and ribbons are included to help with formatting charts, pictures, and images. To access the Contextual Tab, click on the chart, pictures, or image.

Tuesday, January 6, 2009

Microsoft Tip of the Week Excel: Repeat Rows At Top

Microsoft Tip of the Week Excel: Rows to Repeat at the Top
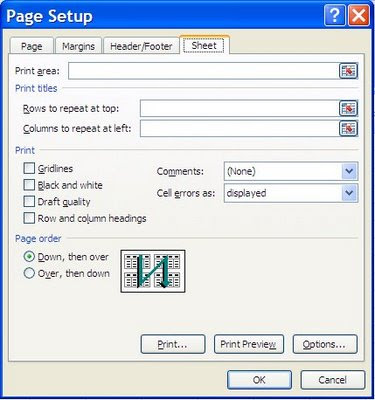
Sometimes it is necessary to have the column headers to print on every Excel Spreadsheet. This can be done using the Rows to repeat at the top option found on the Page Layout Ribbon.
Click on the Page Layout Ribbon and locate the Sheet Options launch arrow.
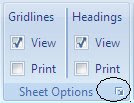
A new Page Setup box will appear.
Click on the small box next to the Rows to repeat at top. A new Page Setup-Rows to repeat at top box will appear requesting which rows you would like to repeat.
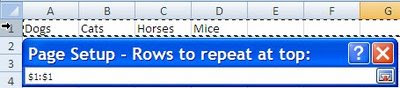

You can click on the row number to highlight the area or highlight manually using your mouse.


Once you have the correct information entered, click on the box again to return to your Page Setup box.
Click OK to secure your task and return to your spreadsheet.

Monday, January 5, 2009

Microsoft Tip of the Week Word: Adding a Text Box


Microsoft Office 2007: Tip of the Week
The Insert Ribbon: Adding a Text Box
The Insert Ribbon Groups include Pages, Tables, Illustrations, Links, Headers & Footers, Text, and Symbols.
One of the upgrades to 2007 includes additional options for the Text Box.

There are total of 36 styles to select from. You can change the size, shape, and color of each box using the formatting Ribbon that appears after you insert the text box.


Give it a try:
Open your word document
Click on the Insert Ribbon
Click on Text Box in the Text group
Select Mod Quote
Change the color to Red using the Text Box Styles Group then Shape Fill or the shortcut colors option
Change the shape to a happy smile face.

Monday, December 29, 2008

Microsoft Tip of the Week Excel: Using Text Orientation and Wrap Text

Excel
Using Word Wrap and Text Orientation on the Alignment Section:
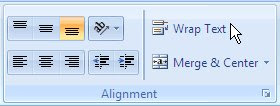
When you need your text to wrap within a fixed width of a cell use the Wrap Text option on the Alignment Section
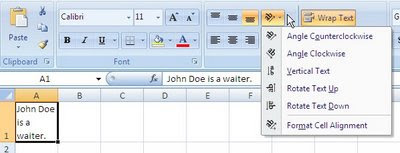
Click on the Cell(s), and then click on Wrap Text
Give it a try:
Type “Joe Doe is a Waiter.” in cell A1.
Click out of the cell and then click on the cell again.

Click on Wrap Text

Using the Text Orientation for text orientation within a cell:


Click on the cell(s) that you would like to change the orientation. Click on the Text Orientation button on the Alignment Section of the Home Ribbon.
Select the option you need from the menu.

Microsoft Tip of the Week: Make a Cover Page for your documents:

Click on the Insert Ribbon, and then click on the Cover Page button. You will get Cover Page options to select. Click on the cover page you would like to appear, and then fill in the necessary information.

Monday, December 22, 2008

Microsoft Tip of the Week: Line Spacing Options

Microsoft Tip of the Week: Line Spacing Options

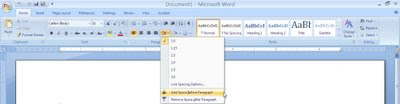
On the Home Ribbon in the Paragraph section, you will find the Line Spacing Option button. Listed are the typical features found in previous Microsoft products. A feature that has been brought to the front in 2007 is the Add and Remove Space before and after Paragraphs. If you have an extra line space between paragraphs in 2007 and can’t remove them using other options, it may be necessary to remove the line using the Remove Space Before or After Option.


Give It A Try:
Type:
Books:
Heaven Can Wait
Walk the Line


Now, highlight the lines and click on the Line Space button and try adding and removing extra spaces after each sentence.

Wednesday, December 17, 2008

Microsoft Tip of the Week: Using the Clipboard

Using the Clipboard
To open the Office Clipboard you must be on the Home Ribbon.


You will note that items are grouped together based on relationship. At the bottom of each grouping are small arrows referred to as Launches.


If you click on the arrow at the bottom of the first group or Clipboard your Office Clipboard will open.


To close the Office Clipboard click on the X located at the top right hand corner of the Clipboard.

Give It a Try:
Open the Word program.
Open the Clipboard.
Type on the document: Snow is a good thing not an inconvenience.
Highlight the text then click on the copy button or use Ctrl + C
You will note the sentence appeared on the Clipboard.

To copy the sentence onto the document, click on it.
When you keep the Clipboard open, you may store up to 24 items to use on the document.