Friday, July 6, 2012

PowerPoint 2010 Using Smart Art Heirarchy for a Family Tree

Hi Everyone,
I'm the family history expert for my family.  Now that the next generation has taken an interest, they ask what have I discovered lately.  Sending a chart of recent family finds can be difficult.  (Everyone is using a different family tree storage option.)  To make it easier for everyone, I've turned to PowerPoint 2010 and use the Smart Art Hierarchy option.  It is easy to use and can be sent via email to those who request the information.  Most of the kids have PowerPoint or an Open Source that accepts PowerPoint.  They can take the information they want or add it to their files for later. 

In PowerPoint 2010 Smart Art Hierarchy, there is an option for photos as well as text.  If I have an image to go with the name, I can easily insert the image using the insert picture option embedded in the text box.
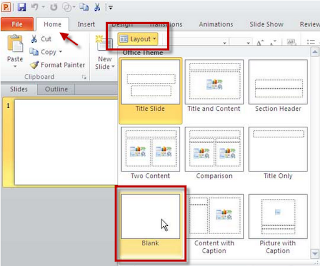
1. Open PowerPoint 2010 and select the Blank Slide option.

2.  Now select the Smart Art option found on the Insert tab and select Hierarchy from the list and use the top, left hand style.  Then click OK.


3.  Once the Smart Art has appeared on your blank slide two new toolbars, Design and Format, will appear.  Select the Design toolbar and in the Layout group select Picture Organization. 

 
NOTE:  The text boxes will change to text boxes that can accept images.

4.  To add text, click on the box you want to add information and type.

5.  To add a picture, click on the picture icon and follow the prompts to add a photo or image to your text box: 1.  Click on Image box.  2.  Select image.  3.  Click on Insert.


Now save your presentation as usual, and it is ready so show.
 

Monday, May 21, 2012

Slide Shark Presentation App

SlideShark
Hi Everyone,
This week's iPad challenge was to find an App for presenting a PowerPoint slide show.  While I tested many, the one that stood out due to easy of use, cost, and storage was Slide Shark by Brainshark, Inc.  Some of the key features include: works with PowerPoint files; preserves animations, fonts, graphics and colors; Tap or Swipe technology; no internet connection required when presenting, presentations are downloaded to the device; share presentation via email or social media.

1.  Locate and download Slide Shark from the Apple App store
2.  The first time you open Slide Shark you will need to create an account
3.  Upload your presentation from your computer using your free online account at www.slideshark.com
4.  Or email the PowerPoint presentation to your iPad or iPhone
5.  If you do not see your presentation in the preview pane, tap the Syncronize button at the top of the screen
NOTE: For an iPad or iPhone you will need a special adaptor for projector viewing

NOTE: Before starting, I recommend taking the short tutorial by Slide Shark.  It will really show you Slide Shark's special features.

Thursday, May 10, 2012

Improve Your iPhone/iPad Performance


Have you noticed your iPhone or iPad being a bit sluggish lately?  You might be chewing up memory without even realizing it.  You see, on iPhones and iPads, even when you "quit" an app, it continues to run in the background.  This is wonderful for easy access, but if you have too many apps running at once it could slow down your device.  And if you have never properly shut down an app, it's possibly every single app you have is still running and using memory.  Luckily, closing your apps is a simple process.


1) Press your Home key twice quickly to bring up all your apps that are currently running.  This feature puts your apps in order of most recently used, so you can jump between them quickly.  It is also how you close apps that are running in the background.


2) Press and hold one of the app icons until they all start wiggling and red lines appear on each icon. It should only take a second or two.


3) Tap the red line on each icon until every icon disappears


You have now closed all your apps!  Press the Home key once to get back to your main screen.

Wednesday, May 2, 2012

Turning your iPod Touch into a Level

Hi Everyone,
I thought I would pass on this little tip about turning your mobile device into a working level (a device used for determining or adjusting something to a horizontal surface).  I know I have had this happen to me many times.  There I am holding a picture up to a wall trying to adjust it.  I know I need a level but it is all the way downstairs.  What I do have is my iPod or cell phone in a pocket or in the kitchen.  Why couldn't it be a level?  Well, it can.

Tim O's Studios Level App
Tim O's Studios Level
There are many free apps for your mobile device including apps that will turn your mobile device into a working level.  Go to the app store for your device, in the search box type "Level."  You may read about the app before downloading by tapping on the icon instead of the Install button.  When you find the one you would like to use, tap on the Install button.  To use the app, tap on the icon that is now on your device.  When the level appears on your screen, use it as you would any other level.  Just be careful, it is still an electronic device.